Since ancient times brick work and concrete block procedure area prime building material with utility value for thatched houses as also for multi-storeyed buildings.
However, the demand and supply ratio for bricks cannot be maintained due to the growing population and the subsequent need for housing.
Moreover, to match the requirements for brick work procedure means exhausting fertile land. Indía, a developing country, cannot afford to damage its resources through the erosion of fertile land.
Plus, the scarcity of skilled labour, the increasing cost of kiln fuel the demand and supply ratio for bricks requires an alternative for bricks.
This has led to the use of concrete blocks as an alternative material. One of the many advantages of concrete blocks and brick is that they can be manufactured on-site.
In this chapter, various aspects of casting blocks and grills such as procedure of the material requirements, stacking curing procedures, advantages, and disadvantages, etc. are discussed.
Practical quality control on the manufacturing of this ‘site made’ stressed for a better final finish and the economy of the building.

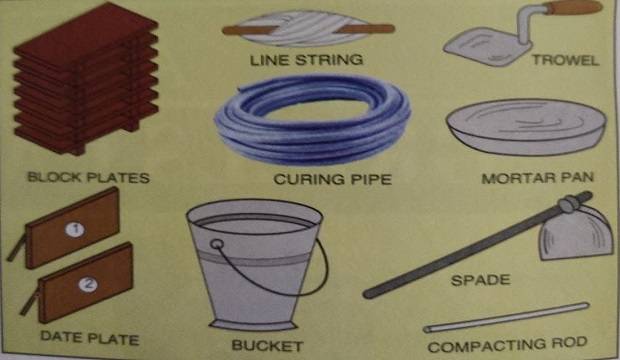
- Block-making machine, hand-operated with and without a vibrator and electrically operated with a vibrator.
- Block pallets, wooden or M.S. (Mild steel)
- Phaudas (spades)
- Ghamelas (mortar pans)
- Measuring boxes
- Compacting rod
- Thapi (Trowel)
- Painted plates for ensuring the casting dates
- Curing pipes
- Sprinklers
Brick Work Inspection Checklist Pdf Link Download Below
- There are two types of block-making machines. Hand-operated machine with and without a vibrator.
- Electrically operated machine with vibrator attachment
- For better-compacted blocks with more strength. An electrically operated machine with a vibrator attachment is preferred than a hand-compacting machine. But since it is expensive, smaller projects can use hand compaction machines with a vibrator.

- Block pallets can be wooden or made of mild steel.
- Wooden pallets are generally made of sal wood and can be of different sizes, Pallet síze should be about 3mm less than the actual block size.
- M.S. pallets are made from 14 gauge M.S. sheet and angle welded at the bottom.
- Oiling and cleaning of block pallets should be done every week and repairs should be carried out periodically.
- Cleaning, oiling, and maintenance of the block-casting machine should also be carried out periodically.
- Block pallets of a special size and shape are used for producing half-length blocks.
MATERIALS REQUIRED BRICK AND BLOCK WORK
For manufacturing blocks, the basic material required is cement, sand, shingle (coarse sand) metal, grit, dust, etc.
PROPORTIONS OF BRICK WORK MATERIAL RATIO
Proportions
A small quantity of stone dust may be added. denser blocks. Proportions of stone dust should not exceed 20% of the fine aggregates.
Easy way to make brick wall
BRICK AND CONCRETE BLOCK MANUFACTURING PROCEDURE
- The following procedure should be followed for the manufacturing blocks work procedure.
- The concrete block shall be 30cm x 150m x 20cm or 30cm x 10cm x 20cm.
- A platform should be prepared by laying P.C.C.
- The size of the platform should be large enough to mix at least 25 deposits (heaps).
- On this platform, the deposit of the material should be dumped as per the decided proportions, using farma.
- Separate depos should be dumped for each cement bag. Generally, the contractor mixes one depo of 5 to 6 bags of cement at a time leading to improper.
- Mixing, ultimately affecting the strength of the block.
- Mix the cement thoroughly to get a uniform dry mix.
- Water should then be added in the depo and wet mixing should be done thoroughly.
- The Water-cement ratio should be kept very low, as a higher w/c ratio block cannot stand for a long time.
- Now, compact the concrete.
- Compaction is important for manufacturing the blocks since the strength of the block depends on how well the block is compacted.
- To make the block fully compacted, the moulds should be filled in layers and compaction done by tamping rod or with an electrical vibrator.
- With a hand-operated machine, 25 strokes are required per layer, while electrical compaction needs 15 seconds to compact the block completely.
- These blocks are then carried manually to the initial stacking yard for the setting.
- Similarly, hollow blocks can be prepared by making certain changes.
- Generally block masonry requires approx. 5% half-size blocks.
- These blocks are used at corners, near windows etc.
- Making two blocks by breaking one full block is not feasible at the time,
- Construction. Also, it can lead to an increased breakage of the blocks, resulting in wastage.
- To avoid wastage, half-size block of 15cmx 15cm x 20cm or l0cm x 15cm x 20cm should be manufactured as per the requirement. Special types of pallets are used for this, as shown in Fig.
- 75mm, 10mm & 125mm. (3″, 4″, 5″) THICK BLOCKS
- For increasing the carpet area of the rooms, use blocks that are less thick. during the line-out of the masonry.
- Due to the thinner base thickness of the block, the Skirting margin can be reduced from 25mm to 8mm as shown in Fig.
- A mix with rich proportions is used for manufacturing these blocks since they take the load of the entire above wall.
- For producing these blocks, special fixtures can be made as shown in the figure, to reduce the size of the block.
REQUIREMENTS OF A QUALITY BLOCK AND BRICK
- Blocks require a minimum of 15 days of curing for the required strength.
- The blocks can be used after sufficient curing.
- A time gap of at least 90 days between the manufacturing date and the utilization date of the blocks is advisable. It is necessary to complete the shrinkage process in newly prepared blocks.
- Chances of shrinkage cracks developing in the masonry reduce considerably with a sufficient time gap.
- So, block manufacturing should commence at least 90 days in advance.
- Accordingly, the procurement of basic materials should be done.
- The minimum compressive strength required for load-bearing solid concrete blocks is 4N/mm? (40kg/cm2) at 28 days. However, the I.S. Code does not specify any particular limit of non-load-bearing solid concrete blocks.
- Practical site experience indicates that the minimum compressive strength required for these blocks should be between 2.5 to 3N/mm2 (25 to 30 kg/cm?) at 28 days.
- Field tests and laboratory tests are carried out to check the quality of the block (Refer to Chapter No.10 for details).
- Freshly prepared blocks should be kept in a row, with a gap of 5cm or 7cm gap, for at least 24 hours, without any disturbance for the initial setting of the concrete.
- After 24 hours, the pallets can be removed from the base of the block by turning, the block slowly on its side.
- The block should be allowed to lie in this position for another 12 hours before stacking it in the stacking yard. Curing of these blocks should be done at least 4 times a day.
- The blocks should then be carried to the stacking yard for stacking and curing.
REQUIREMENTS OF A GOOD STACKING YARD
- A good stacking yard should be properly levelled with ample space with shade.
- Generally, the parking place of the building or the shaded area under a big tree makes good stacking yards.
- Water connections should be provided in the stacking yard at convenient places, for easy curing.
- The blocks should be stacked in rows and heaps. with a gap of 5cm between each stack for ventilation.
- There should be a gap of 1m after every 20-25 rows for easy lifting of the blocks.
- Each stack of a block should contain six numbers of blocks placed one above the other.
- Blocks should be stacked in so that the edges of every individual block remain intact.
- The casting date number plate should be kept on the stack for ensuring the curing days of the blocks.

- Curing is the most important aspect of All efforts to produce.
- production of blocks. quality blocks will be useless if curing is not.
- done properly.
- The following steps should be observed during the curing of the blocks.
- Cure the individual stack.
- Ensure that the lowermost block in the stack has soaked water.
- Generally, to finish the work quickly, the curing man waters only the top layer of the stack and the remaining, layers remain uncured.
- The curing of the blocks should start immediately after stacking and it should continue for at least. fifteen days after the casting date.
- Curing with a water pipe is essential for every block at least four times a day.
- In addition to pipe curing, sprinkler curing is also advisable.
- Due to sprinkler curing, the blocks remain moist all the time, resulting in an increase in the ultimate strength.
- Number plates indicating the casting date should be strictly displayed every day on the stack for easy supervision of curing
 |
| FLOWCHART OF BRICK AND BLOCK MANUFACTURING PROCESS |
CHECKLIST FOR QUALITY CONTROL ON BLOCK AND BRICK PRODUCTION
- Measure all ingredients of the mix with measuring boxes.
- Avoid mixing vegetation or other organic material in the mix.
- As far as possible, dump the depos for half bag mix only.
- Keep the water-cement ratio as low as possible.
- Avoid excess use of dust because it gives a smooth finish to blocks which are not advisable at the time of plaster.
- Keep a strict control on the size of the blocks. If the size is reduced while manufacturing, it is uneconomical during construction, as the number of joints increases.
- Avoid handling of fresh blocks. Don’t disturb the fresh block for at least 24 hours.
- Don’t stack more than 6 blocks one above the other, as the lowermost block may get crashed due to the load.
- The use of a vibrator during manufacturing is a must for producing dense and impervious blocks. However, avoid excess vibration.
- Stack the blocks in shade as far as possible.
- Keep 5cm to 8cm (2″ x 3″) the gap between each row of the blocks to allow ventilation. Otherwise, the bottom-most blocks will not achieve the required strength.
- Insist on sprinkler curing in addition to pipe curing. The sprinkler will keep the blocks moist. leading to higher strength.
- Don’t use the blocks unless the curing period is over.
- Ensure that the edges of the blocks remain sharp from the manufacturing time up to the final use. For this add the chemicals, available in the market.

GRILL CASTING
1. REQUIREMENTS
MOULD: A teak wood mould should be prepared for this purpose. It should be cleaned and oiled after every operation. After manufacturing 100 Nos. of grills, the mould should be repainted with oil paint. Good maintenance of the moulds will increase the life and the number of grills manufactured.
2. RAW MATERIAL
- Cement
- Grit
- 12 mm metal
- Sand
- Steel
Mix these ingredients in equal proportions i.e. 1:1:1:1. Normally, 5 Nos. of medium-sized grills can be manufactured in one cement bag.
6mm or 8mm and steel cut-pieces can be used as reinforcement. This reinforcement should be tied properly with the help of a bonding wire, before placing it in the mould.
3. OPERATION PROCEDURE
- Measure all the ingredients in proportion. Mix the dry and then add sufficient water for proper consistency.
- Take an oiled mould and fill half the thickness of the mould with the mix.
- Place reinforcement that is tied properly.
- Pour the remaining mix for full thickness.
- Add dry cement on top to get a proper finish.
- Wait for about half an hour for the initial setting.
- After sufficient setting, lift the mould slowly to release the grill. Turn the mould downwards, slowly and evenly, so that the grill slides on the ground.
- Apply cement slurry with a brush to this ready grill, so that fine holes, bubble deformations, etc. are filled up.
- For the final setting, leave this grill undisturbed for 24 hours.
- Put this ready grill in the curing pond for a minimum of 15 days:
- If the grills are manufactured on-site, it saves almost 25% of the cost, while providing better quality.