The painting work procedure is the finishing item in any construction. Painting affects the total appearance of a building from inside and outside. Therefore, it should be carried out with the great skill of workmanship.
This chapter deals with the painting work procedure, specification of materials, types of paint, mode of measurements, etc.
OBJECTS OF PAINTING WORK
Paints and varnishes are used in building and other engineering works for covering the surfaces of wood, metal, masonry, plastered walls, slabs, etc.
FOLLOWING ARE THE MAIN OBJECTIVES OF PAINTING WORK
- To protect the surfaces from atmospheric influences and to preserve them from decay, oxidation, and corrosion.
- To improve the appearance of surfaces.
- To facilitate the cleaning of surfaces.
TYPES OF PAINTING WORK
- Interior of flats bungalows.
- Interior common areas of a building.
- Exteriors of the building.
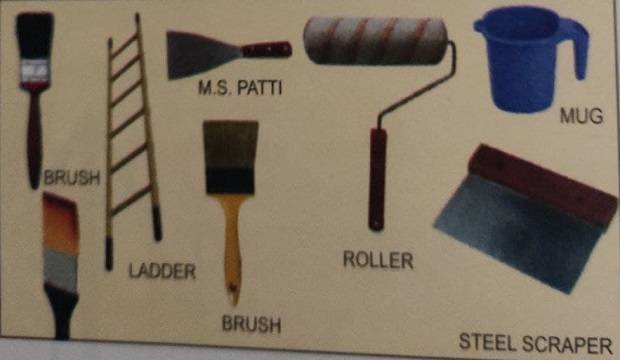
TOOLS REQUIRED FOR PAINTING WORK
Scraping patti, ladder, ghoda, zula, distemper brush, wash brush, oil paintbrush, fine brush; scraping papers 60 No., 80 No., 100 No., 120 No., scraper (metallic sheet), measuring jar, weighing balance, spray for whitewash, burning stove, fine chisel, and hammer.
PAINTING WORK PROCEDURE STAGES
- Donga
- Whitewash
- Dry distemper
- Oil paint
- Cement paint
1. DONGA
Donga is the lime water coat that is applied on plastered walls after the curing period is completed. Donga should be applied after a minimum of 21 days on Neeru finished walls and ceilings.
USE OF DONGA
- It absorbs moisture from the walls and helps achieve a better paint finish afterward.
- It acts as a crack filler for hairline cracks, on the freshly plastered sanla neeru surface of the walls.
- It acts as a basic coat for distemper and whitewash.
PREPARATION AND PROCEDURE OF DONGA
- Ensure that all plastering work is a plate, along with the necessary curing.
- All ghabadi work (wall punctures) should be completed along with the necessary curing.
- Scrap the wall with a steel scraper of size 10cm x 7.5cm (4″ x 3″), to remove any unwanted material on walls, i.e., excess cement mortar, nails, dust, etc.
- Take 1/2 kg of lime to cover the 10sq.m. (108s.ft.) area of the wall surface.
- Take the lime in a drum and mix the water in a 1:2.5 ratio (1kg lime to 2.5 liters of water).
- Stir this mixture properly.
- If required, sieve the lime water through a fine cotton cloth and remove the residue.
- Take a small quantity of lime water in a 5 liters tin.
- Apply donga with a 10cm (4″) wide bristle hairbrush.
- The Donga layer should not be very thick.
- Water should not be spread on donga until the application of distemper.
2. WHITEWASH
Whitewash can be applied to ceilings or walls, as specified.
PREPARATION AND PROCEDURE FOR WHITEWASH
- The preparation of whitewash is the same as donga.
- Add “Blue” to the lime water paste and mix properly. Then sieve through fine cotton cloth.
- Surfaces, where whitewash is to be applied, should be made smooth by rubbing out donga with fine paper.
- Apply the first coat of whitewash and allow it to dry for a minimum of 24 hours.
- Before applying the second coat of whitewash on the walls, ensure that the final coat of tile polishing is complete. This prevents stains of the polishing slurry.
- After the touch-up work is over, apply the third and the final coat on the walls/ceilings and check that no brush impression is visible.
- The final coat of the whitewash can be applied with a spray machine.
- After the coat has dried, check the appearance of the whitewash. Rectify any shade differences with another coat.
3. DRY DISTEMPER
Dry distemper is normally applied to the smooth finished surface of the walls in flats/ bungalow architect. It is available in the Selection of shades that should be approved by the chief engineer. Shades can also be made as required.
SURFACE PREPARATION FOR DRY DISTEMPER
- Clean the wall surface thoroughly.
- Remove donga completely with a scraper and polish the paper.
- Rub the wall surface with a fine-grade paper 120 No. to ensure the proper adhesion of color.
- Clean any greasy spots and smoky surfaces carefully.
There are two methods to apply the dry distemper
- Dry distemper with primer and putty over the wall.
- Simple three coats of dry distemper.
For bungalows or ‘A’ class schemes, dry distemper with primer and putty is preferred.
(A) DRY DISTEMPER WITH PRIMER AND PUTTY
PRIMER PREPARATION AND APPLICATION
- Prepare the primer by adding 0.40 liter of turpentine to 0.80 liters of ready-made cement primer, to cover 10sq.m. (108s.ft.) of the wall surface.
- After surface preparation, apply the primer with a brush on the total surface of the wall.
- Allow the primer to dry for at least 24 hours.
PUTTY PREPARATION AND APPLICATION
- The engineer should check and ensure that the contractor follows the correct procedure of painting.
- Prepare the putty by mixing 3kg whiting powder with 0.25-liter cement primer, 0.25-liter synthetic enamel, O.15 liter linseed oil, and 1-liter water, to cover 10sq.m. (108s.ft.) wall surface.
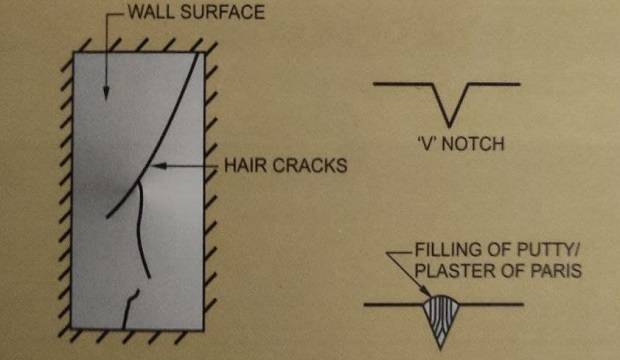
- Fill up all the undulations of minor nature, dents, and cracks, so that the surface becomes completely smooth to receive paint.
- Where the dents are deeper the filling must be done with a filler paste of a thicker consistency and plaster of Paris.
- After 24 hours, the surface should be rubbed with fine paper, to get a smooth finish and even surface over the wall.
- Clean the wall surface with a dry cloth, to remove all dust and particles in the powder form. Prepare the wall for the first coat of distemper.
FIRST COAT OF DISTEMPER
- Use 1kg of dry distemper to cover 10sq.m. (108s.ft.) area.
- Add water 0.8 liters for 1kg of distemper.
- Add 25gm glue in 1kg of dry distemper, to get more adhesion of paint to the wall surfaces.
- Stir this mixture constantly with a bamboo stick while it is being used.
- Use 10cm (4″) bristle hairbrush for applying the ‘distemper.
- Brushstrokes should be first horizontal and then immediately in a vertical direction. Ensure that there are no brush marks left on the surface after the coat has dried.
- The dried surface of the wall should not appear should it easily stain the
- powdery nor hand when rubbed.
- Clean the floor immediately.
- Allow the first coat to dry for at least 24 hours and then start the second coat.
- Use 0.5kg of dry distemper to cover 10sq.m. (108s.ft.) area.
- Add adhesíve/glue, 25gm for 1kg of paint.
- Stir this mixture constantly with a bamboo stick.
- Apply dry distemper in the same manner as the first coat.
- Apply successive coats of paint only after the prior coat has dried completely and never before 12 hours.
(B) FOR DRY DISTEMPER WITHOUT PRIMER AND PUTTY
- Prepare the surface as explained earlier.
- Apply the first coat of dry distemper directly on the prepared surface as per the procedure given earlier.
- Do not use the primer and putty before the first coat.
- After the first coat, fill all undulations, dents, cracks, etc. properly by applying putty, so that the surface is completely smooth.
- For deeper dents, the filling must be done with a filler paste of a thicker consistency and plaster of Paris.
- After drying (for 24 hours), the putty surface should be rubbed with fine polish paper for a smooth finish.
- Apply the second coat as explained above.
- After the second coat, check for any cracks or dents. If observed, they should be filled and proper rubbing should be done with a fine polish paper.
- Apply the third coat as the final coat of paint.
- After drying, ensure that there are no brush marks or color variations.
- Clean the floor area.
- Ensure that the junction of the ceiling whitewash and wall distemper is painted in a proper line and level.
PRECAUTIONS IN DRY DISTEMPER
- Prepare the distemper paste after the surface is ready for distemper application.
- Do not use distemper which is prepared 24 hours earlier.
- Sieve the distemper slurry through fine cotton cloth, particles.
- Ensure that the shade/brand of the distemper is similar for all coats.
- Use brushes of the correct size/quality for different shades.
- Do not apply the distemper on wet walls.
- Check the quality of ingredients for the putty to remove any coarse
- preparation.
- Do not allow the painter to use a lesser quantity of distemper on the surface area than specified.
- Keep a minimum 8 hours gap between two coats in summer and 18 hours gap in the monsoons.
- Do not forget to add adhesive/glue to the distemper.
FOR M.S. DOORS, GATES, WINDOWS
PREPARATION OF SURFACE
- Remove all cement mortar with a scraping Patti.
- Use sandpaper and emery black stone to remove any unwanted welding burr.
- The inner sides of the steel sections of the windows should be scraped properly. (Painters usually neglect this).
- Check for the free movement of hinges, and working systems. If required, get them repaired before the primer/first coat.
- Apply zinc chromite metal primer to the total surface of M.S. doors, windows, gates, etc. for the first coat of oil paint.
- After checking the required preparations, apply the first coat of oil paint with a good-quality brush.
- After 24 hours of drying, apply the second coat of oil paint.
- Ensure that all the inner sides of the steel sections of the windows are painted.
- Ensure that the painter uses 0.5 liters of oil paint per coat to cover 10sq.m. (108s.ft.) of the plain surface.
- For quick drying of the paint, add a drier like Litharge or Massicot.
- Check the door shutters for free movements/bend/termite attack etc.
- Check the door frames for line/level/ plumb/quality etc.
- Do not fix the door fittings unless the first coat of oil paint is applied to the door shutters.
- Apply a wood primer to door frames and shutters.
- The top of the door shutters should also be painted during every coat of oil paint.
- After primer application, fill up any holes/depressions with primer putty. as mentioned earlier.
- Apply this putty on the total surface of the door shutter evenly with a metal sheet, to fill up all the dents, depressions, etc.
- The site engineer should approve the preparations before starting the first coat of oil paint.
- Mix the stainer in oil paint and prepare a sample of the approved color. sample of shade from the C.E.
- Check the approved quality/brand of oil paint and ensure that the sealed tins of the paint are opened in the presence of the engineer.
- Apply the first coat of oil paint with a varnish brush.
- Allow drying for a minimum of 24 hours.
- Check the quantity of stainer added in the first coat. The same quantity should be continued in the second coat.
- Use a small brush, in case of any narrow or underside of the door shutter/frame.
- Ensure that the sides of the cover moulding are painted with a small brush. (Painters usually neglect this).
- After completing the first coat, apply putty again on the portion where cracks/dents/depressions are observed.
- After rubbing off the putty patches, apply the second coat of oil paint as the final coat.
- Check the mixing for the perfect shade of both coats, to avoid any variations in shade.
- Do not disturb the shutter until it has dried completely.
- After drying, clean the door fittings with a paint remover solution or turpentine.
- Use the paint remover carefully. Do not allow it to come in contact with the shutter paint.
- Do not forget to paint the top of the shutter and the sides of the cover moulding.
- Paints used for all the coats should be of the same make and quality.
(a) CEMENT PAINT
Normally cement paint is used for the external walls of the building. Plastering of these walls is done with a sand-faced finish. Textured paints can be used for elevational features. For external painting, follow the procedure mentioned below.
- For better work quality, all exterior painting work procedure should be carried out on scaffolding.
- Try to avoid using Zula.
- Clean the external wall surface by removing dust, mortar droppings, etc. with a scraper and sandpaper 80 No.
- Finish all the internal as well as external works including all ghabadi finishing. plumbing lines, electrical works, etc.
- Water the surface for at least 12 hours, before applying the first coat of cement paint.
- Fill all the cracks with white cement or crack filler chemicals.
- Prepare the cement paint by adding water to the ready-made cement paint which is available in powder form.
- Add 1 liter of water to 1kg of cement paint. Mix thoroughly to get a creamy consistency. 3kg of cement paint should cover two coats of 10sq.m. (108s.ft.) wall surface.
- Apply the first coat with a good-quality brush. Brushstrokes should be first horizontal and then vertical, to avoid brush marks on the surface.
- Cure the first coat 6 times a day for 7 days, by using spray pumps.
- Fill up the hairline cracks with filler material.
- Ensure that the first coat is a bit thicker.
- Do not allow the painter to do the second coat until the curing period of the first coat is over.
- Apply the second coat by using 1.25kg cement paint to cover 10sq. m. (108s.ft.) of the wall surface.
- Allow the second coat to dry for a minimum of 24 hours.
- Cure the second coat for 7 days with a spray pump or water pipe.
- Clean the surfaces like windows, glass, terrace floor, pipes, doors, fixtures, electrical switches, etc. thoroughly.
- Ensure that cement paint powder is added to the water and not vice versa.
- Only the required quantity of paint, for one hour’s work, should be mixed at a time.
(b) TEXTURED PAINT
- Normally, textured paint is applied in three coats, including the base coat.
- Basecoat should match the color of the cement paint.
- Apply two coats of textured paint.
- Sometimes one coat of cement paint as a base coat and one coat of textured paint suffices for the required finish.
- 1.7 liters of textured paint should cover 2 coats of 10sq.m. (108s.ft.) wall surface.
- Follow the same procedures as cement paint, for textured painting work procedure.
- Textured paint is available in liquid form.
- Ready-made textured paint is also available in the required consistency. It can be directly applied with a brush.
(c) FRENCH POLISH TO WOODEN SURFACE
The following work sequence should be adopted for polishing works
- Clean the wooden surface of all dirt/dust, by rubbing it with a fine cloth.
- Rub the surface with polished paper 80 No. to clear up the veins of a single door from both sides.
- Apply a coat of polish powder 1.25kg to cover 10s.qm. (108s.ft.)
- Rub the surface with a polished paper.
Knotting or Stopping
All the visible and minor holes, and indentations in the wood’s surface are filled either by mixing whiting (ground chalk) in methylated spirit with 1.25kg of whiting to 1 liter of spirit or mixing beeswax linseed oil and turpentine.
- Rub the surface with polished paper and wipe clean.
Preparation for French Polish
Mix 0.15kg of pure Shellac in 1 liter of methylated spirit and sieve the solution through a cotton cloth. Add pigment to get the required shade. In the case of ready-made polish, use 0.4 liters of polish to cover 10s.qm. (108s.ft.)
Application of French Polish
Apply polish with a pad of woolen cloth covered by a fine cloth. Wet the pad with the polish and rub gently on the surface in a universal direction (either horizontal or vertical) to cover the entire area.
Application of second third coat of polish
- After the first coat has dried, apply the second third coat or more coats, in the same way as described above, to get the desired finish as per the requirements.
- Take precaution to place papers on the floor before starting polishing work, to prevent staining of the tiles. It is very difficult to remove polish stains from the floor tiles.
- Ensure that the shade of polish is by the Chief Engineer.
- Check the complete work for the correct shade, polish quality, and shining of polish. entire area covered, cleaning of door fittings, floor, etc., and giving the final N.O.C. to the contractor for the clearance of his bill.
GUIDELINE FOR PREPARING ESTIMATION PAINTING WORK MIX FOR 10sq.m. (108S.FT.) OF SURFACE AREA
| SR NO | ITEM | MATERIAL | QUANTITY |
| 1 | DONGA | LIME WATER POLISH PAPER (120 NO) |
0.50KG 1.25LITRE 1 NO |
| 2 | WHITEWASH (FOR EACH COAT) |
LIME WATER DDL/GLUE BLUE |
0.75KG 2.50LITTER 25GM AS PER REQUIREMENT |
| 3 | DRY DISTEMPER PRIMER APPLICATION (1 COAT) |
CEMENT PRIMER TURPENTINE |
0.80 LITTER 0.40 LITER |
| PUTTY APPLICATION (5 KG) (1 COAT + TOUCH UP) |
WHITING POWDER CEMENT PRIMER SYNTHETIC ENAME LINSEED OIL WATER POLISH PAPER (120 NO) |
3 KG 0.25 LITTER 0.25 LITTER 0.15 LITTER 1 LITTER 1 NO |
|
| DISTEMPER APPLICATION FOR 2ND COATS |
DISTEMPER WATER DDL/GLUE POLISH PAPER (120 NO) |
2 KG 1.50 LITTER 50GM 1 NO |
|
| 4 | OIL PAINT (1 COAT PRIMER AND 2nd COAT OIL PAINT) PRIMER APPLICATION A) FOR WALL |
CEMENT PRIMER TURPENTINE PUTTY |
0.80 LITTER 0.40 LITTER 5 KG |
| OIL PAINT (2nd COAT) A) FOR WALL |
OIL PAINT TURPENTINE POLISH PAPER (300 N) |
1.25 LITTER 0.25 LITTER 2 NO |
|
| B) FOR M.S WINDOWS | ZINC CHROMITE PRIMER EMERY BLACK POLISH PAPER (150 NO) OIL PAINT TURPENTINE |
1 LITTER 3 NO 1 LITTER 0.25 LITTER |
|
| 5 | FRENCH POLISH | READY FRENCH POLISH | 0.5 LITTER |
| PUTTY PREPARATION | WHITTING METHYLATED SPIRIT |
1.25 KG 1.0 LITTER |
|
| POLISH PREPARATION | SHELLAC METHYLATED SPIRITE (PIGMENTS FOR SHADE) |
60 GM 0.40 LITTER AS REQUIRED |
|
| 6 | CEMENT PAINT (2nd COATS) |
CEMENT PAINT WATER |
3 KG 3.0 LITTER |
PAINTING WORK MODE OF MEASUREMENT
| OPENING | DEDUCTION | JAMS / SOFFITS |
| GREATER THAN 0.5 SQ.M | FULL DEDUCTION | TO BE GIVEN |
| LESS THAN 0.5 SQ.M | NO DEDUCTION | NOT TO BE GIVEN |
(b) Distemper whitewashes oil bond/cement paint etc. as per the measurements of plaster. Jams and soffits to be included in the measurements. Door and window openings to be deducted fully.
(c) All pipes and steel poles to be measured in a running meters, inclusive of fittings.
(d) Oil paint to wooden or M.S. surface to be measured from one face and apply a multiplying factor to get the painting area for billing purposes.
 |
| painting work flow chart |
Very good and needful information provide thanks for giving me working required information.
Best website for civil engineering
Very informative and thanks for your guidance……Keep going Sir